How To Remove Granite Countertops
Thinking about removing your granite countertops? Before you dive into such an unwieldy project, it’s important to know the risks. Granite is heavy enough to cause accidents and injuries. It’s also quite easy for do-it-yourselfers to damage plumbing, flooring and more during the removal process. With this in mind, it’s generally best to call a reputable granite countertop contractor to safely execute the task. If you’re dead set on doing it yourself, however, these are the steps you should take.
First Things First
Although contractors prefer to break granite tops into smaller pieces for removal, it is possible to remove them in one single piece with a well-thought-out plan. Granite is quite heavy and breaks very easily, so use caution during the removal process, if you want to keep it intact. Be sure to prepare a sturdy surface to place the countertops before you get started. You should also recruit plenty of strong, reliable help to safely remove the countertop in one piece. While the work may appear simple, the challenge is staying patient to avoid mistakes.
Sinks and Fixture Removal
Step 1
Start by shutting off the water at the emergency valve, usually located below the faucet within your sink cabinet. Turn both cold and hot valves clockwise until they stop. Disconnect all the water lines right above the valves by turning the nut on the line counterclockwise using pliers or a wrench.
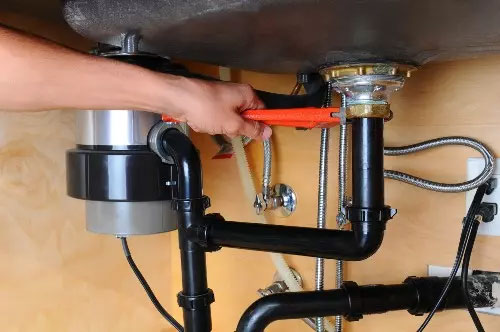
Step 2
Trace the disconnected water lines all the way to the bottom of your sink. Remove the large hold-down nuts by turning them counterclockwise. Remove your faucets by pulling them up from the top. Set your plumbing fixtures in a safe place.
Step 3
Look within your cabinet to locate the hold-down brackets beneath the bottom of your sink. Remove the nut on the bottom of each bracket by turning them counterclockwise. Break up any glue or caulk by running a putty knife under the edge of any sink that sits on top of the granite counter. For inset-style sinks, break the seal by running the putty knife between the top of the sink and the bottom of the granite. After you break the seal, use a rubber mallet to lightly tap on the bottom of the sink. Once you drive the sink up, lift it out and store it in a safe place.
Step 4
Look at the underside of the granite. Make a mental note of all the places where the cabinets touch the underside of the stone (if the granite is exposed). Make note of everywhere the plywood or other wood platform top contacts the cabinets.
Step 5
Use a power drill and screw tip to take out all the screws from the plywood layer beneath the countertop from within the cabinets. Watch for any screws running up through the cabinet top support into the underside of the plywood. If you can’t find any, you will likely need to break the glue seal between the granite and the plywood before you can remove the plywood.
Step 6
Using a hammer, wedge the end of a flat pry bar behind the edge of your backsplash in the top corner. Gently pry the backsplash from the wall, beginning at one corner and working across its length until the entire backsplash easily pulls from the wall. Do this for every part of the backsplash lining the countertop.
Granite Countertop Removal
Step 1
Find the joint between the bottom of your countertop at a corner and the front brace of the cabinet. Look inside the facing of the cabinet to locate it. Use a hammer to tap the end of the pry bar into this joint. Gently pry upward to break up any glue. If there is any plywood beneath the granite, work beneath it to remove the granite from the plywood. Or, if necessary, remove them together. This will usually only work if you were able to remove all the screws that held the wood platform in place. Once the joint is open, tap a wooden shim within it to hold the countertop up in that spot. Work along the front edge, shimming and prying, until the entire front edge is lifted slightly.
Step 2
Move further within the cabinets. Begin at the front and move back using the pry bar to lift the granite (or both the plywood and granite) away from the cabinet supports. Keep adding shims as you go. Work slowly to keep from cracking the granite. Be sure to work along the length of the granite countertop, only prying up the next few inches. Continue working slowly in sections until the countertop has been lifted.
Step 3
Station one person along the front edge of the counter every 3 to 4 feet. Work together to tilt the countertop upward from the back edge, so it tips down into the waiting hands of the workers. Lift gently and transport the granite to your established storage place.
Step 4
Set the granite surface with the top facing down for protection. If there is any underlying plywood that needs replacing, carefully pry it away from the granite. Work slowly and carefully to separate all the glue and remove the plywood. Use a heavy-duty scraper to remove any additional glue or plywood from the bottom of the granite.
As you can see, removing granite countertops can be a tedious process fraught with all sorts of pitfalls. With this in mind, it’s generally best to rely on an experienced contractor who can execute the task in a safe and timely fashion.
Rock Solid has gained a well-deserved reputation for being the best, most reliable granite counters company. Employee-owned, our company does it all without outsourcing any jobs to subcontractors. When homeowners work with our skilled experts, they can expect flawless natural stone countertops that stand the test of time. To get started on your next granite countertop project, contact us.
Are you remodeling your kitchen or bathroom? When it comes to the question of countertops, it can be easy to feel overwhelmed by all the options.…
How has your week been? Unless you just got back from vacation, you’d likely say it was busy. Durango, CO residents lead busy lives, juggling family…